검색결과 리스트
학교에 해당되는 글 43건
- 2014.09.16 Computability Logic에서 말하는 Program이란?
- 2014.03.20 [소공] 실습 3주차
- 2014.03.20 [소공] 11.09.06
- 2014.03.20 실습 1주차
- 2014.03.20 수업 계획
- 2013.06.07 OPENGL 설치
- 2013.06.05 openGL 설치
- 2013.05.03 reshape.cpp
- 2013.05.03 mouse.cpp
- 2013.04.18 실습 채팅 ClientFrame
글
Computability Logic에서 말하는 Program이란?
프로그램이란 간단하게 생각하면, 두사람이 대화하는 것으로 볼 수 있다. 예를 들어 A라는 사람이 B라는 사람에게 1에서 100까지 더하라고 하였다. B라는 사람은 이문제를 해결하기 위해 규칙을 학흡하여야 한다 , 그리고 규칙을 학습한뒤 5050이라는 답을 내놓을 수 있다. 이러한 대화를 computability logic으로 이해하려면 A라는 사람이 사용자고 B라는 사람은 컴퓨터가 된다. 그래서 A라는 사람이 UySum(1,100,y)입력하면 컴퓨터는 몇가지 Rule(Sum(1,1,1) , Sum(1,n,n+y) if,Sum(1,n-1,y))를 학습하게 된다. 그러면 다음 컴퓨터는 5050이라는 값을 출력하는 것으로 해 할 수 있다.
설정
트랙백
댓글
글
[소공] 실습 3주차
http://nnoco.tistory.com/35
They say :
assembly language is low-level java, C# are high-level.
But they do not talk about highest-level languages
The answer is yes.
What is the highest-level languages?
case1. view a computer as a 4-year old baby
case 2. view a computer as a 10-year old boy
case 2. view a computer as a college student
example of Prolog
obj : fact(0, 1)
fact(x+1, xy + y) :- fact(x,y)
main:
fact (5,x)
So there is a final goal
난 소공을 배우고 싶다.
설정
트랙백
댓글
글
[소공] 11.09.06
출처 : http://nnoco.tistory.com/33
How can you explain the switch app to a programmer?
switch's essense
i can say step 1!
display a switch with on and off
step 2 : wait for the user to choose either "on" or "off"
Step3 : if the user chooses "on", then the switch becomes bright. If he choose "off" then the switch becomes dark.
This description seems OK but there is a serious problem.
What is the correct way to describe the switch app?
스위치의 본질과, 무엇을 수행할지를 알려줘야한다.
<O, T> where O is the essence of and object
and T is the specific task. in mind
쓸데 없는 말이 많다. 그냥 개체의 Specification을 정의하면 그 개체의 본질과 행동(Task)이렇게 두가지다.
위의 스위치의 예제는 essense는 없고 task만 있는 상태.
What is O of the switch in this classroom?
switch : on c-and off
the final answer
(on c-and off, on c-and off)
(on c-and off, on)
(on c-and off, off)
claim: Given an obejct, we describe the essence of O by describing what can do.
외부적으로 드러나는 Task(사용자와의 인터페이스)
앱이 내부적으로 하는 모든 행동(본질) Essence.
Specification of chinese restaurant.
Object :
Task :
이런 조카 18색 크레파스 설명을 못하네.
'학교 > 소프트웨어공학' 카테고리의 다른 글
| ychoose (0) | 2015.05.21 |
|---|---|
| 스마트폰 대충 설계?! (0) | 2012.12.10 |
| (0) | 2012.12.04 |
| (0) | 2012.11.27 |
| (0) | 2012.11.13 |
설정
트랙백
댓글
글
실습 1주차
출처 : http://nnoco.tistory.com/30
소프트웨어 공학을 위한 언어. 요고 두개만 알면 끝나는 얘기입니다.
1. Specification 언어(명세 언어)
- 대상 : 사람(Programmer)
2. programming 언어
- 대상 : 컴퓨터(컴퓨터가 이해하는 언어)
Specification
--->
Customer Programmer
<---
Programming
(S.L ⊂ P.L)
둘 다 재미없죠. 그래도 명세언어가 프로그래밍언어보다 좀 더 쉽다.(개인차가 있을거 같음)
claim
1. Specification Language = CL(Compatibitliy Language)
2. Programming Language = CL
한마디로 Compatibity Language은 만병통치약이라 이거죠.
※ Compatibility : 양립, (컴퓨터의) 호환성
Specification의 Example
ex1) 앱을 실행시키면 사과가 나오는데 아무것도 안하고 사과만 디스플레이한다 이거죠.
app : display an apple
ex2) switch(on <-> off)
위의 두 예제 처럼 간단한 경우는 큰 문제가 없죠. 좀 더 복잡한 예를 들어봅시다.
ex3) Alarm App
app <-> 사용자 interactive 해야함.
Specification 언어 : 어떤 객체를 가장 세련되게 설명하는 것이 중요.
ex4) chinese restaurant
메뉴는 간단하게 하기 위해서 자장면과 짬뽕만 있다고 가정
표현할 수 있는 언어 : korean, english, java, c, ...
- korean
Step1. emplyee offers a menu
Step2. 적절한 메뉴를 고르지 못하고 우유부단하게 방황하고 있음
Step3. 무한 반복. 아무거나. 너랑 같은거, 맛잇능거
Step4. customer choose betwenn black noodle and mix noodle
Step5. pay \5,000
- java
Step1. Execute chinese restaurant application.
Step2. Display a menu
Step3. user select item.
Step4. restaurant object get user's choice.
Step5. cook.
Step6. offers cooked items
Intro to CL :
ex) apple => apple
ex) coin => coin
ex) switch
상태가 있고, 사람이 동작시키길 기다리고 있음
switch => on choice-and off
※ 사람이 고를 수 있는게 choice-and?
ex) chinese restaurant
=> 5000 -> (짜 c-and 짬)
5000원을 주면 선택한 두가지 중에 한가지를 주겠다는 뜻으로 -> 를 사용.?
?? 막 만들어냄
오늘부터 새로운 언어의 창조를 보게 될것이다. 자빠리치 창세기 제 1장 1절.
def) A ->(implies) B : A 이면 B이다.
쉬운걸 개 어렵게 만드는 능력
하드하드 열매 섭취하심.
'학교 > 컴퓨터프로그래밍' 카테고리의 다른 글
| [소공] 실습 3주차 (0) | 2014.03.20 |
|---|---|
| 수업 계획 (0) | 2014.03.20 |
| 6/5 (0) | 2012.06.05 |
설정
트랙백
댓글
글
수업 계획
topics:
1. computability logic: Japaridze:
in the beginning was game semantics
2. traditonal software engineering: (textbook, ppt자료)
3. book:
2: 그들이 프로그래밍에 대해 말하지 않은 10가지
report: 5 page Java 비판, CL 찬양 그들은 말한다
: 객체는 method를 수행하고 method는 함수나 procedure이다.
그들은 말하지 않는다: 부연설명:
5. term project:
구현전단계까지:
- idea brain storming:
grade: - class participation: 20%
----------------------------------------------
problem: coffee vending machine: how can we explain a coffee vending machine?
유: 외모: 성격: capability: 론: sw = capability를 어떻게 표현하느냐를 연구하는 학문
=> CL is the first approach to express capability:
'학교 > 컴퓨터프로그래밍' 카테고리의 다른 글
| [소공] 실습 3주차 (0) | 2014.03.20 |
|---|---|
| 실습 1주차 (0) | 2014.03.20 |
| 6/5 (0) | 2012.06.05 |
설정
트랙백
댓글
글
OPENGL 설치
OpenGL은 뭐 VS 깔면 알아서 깔리는거같지만 여기저기 예제를 사용하기 위해서는
GLUT를 설치해야한다.
일단 다운로드부터 받자
http://www.opengl.org/resources/libraries/glut/glut_downloads.php
잘 찾아보면 100kb정도짜리 압축파일이 있습니다.
거기보면 glut.dll, glut32.dll, glut.lib, glut32.lib, glut.h 가 있습니다.
하지만 찾기 귀찬으니 링크
 glutdlls37beta.zip
1. C:\Windows\System32 에다가 dll 파일을 집어넣는다.
1-1. 가끔 dll을 못찾는다는 메세지가 뜬다면 C:\Windows\SysWOW64 에다가 넣으면 됩니다.
2. C:\Program Files (x86)\Microsoft SDKs\Windows\v7.0A\Lib 에다가 lib 를 넣습니다.
3. C:\Program Files (x86)\Microsoft SDKs\Windows\v7.0A\Include\gl 에다가 glut.h 를 넣습니다.
※32bit 운영체제에서는 (x86) 이 없고 VS 버전에 따라서 v6.0A, v5.0A 로 되어있는 경우도 있습니다.
그리고 예제를 한번 돌려봅시다.
01 | #include <gl/glut.h> |
02 |
03 | void mydisplay(){ |
04 | glClear(GL_COLOR_BUFFER_BIT); |
05 | glBegin(GL_POLYGON);{ |
06 | glVertex2f(-0.5, -0.5); |
07 | glVertex2f(-0.5, 0.5); |
08 | glVertex2f(0.5, 0.5); |
09 | glVertex2f(0.5, -0.5); |
10 | }glEnd(); |
11 | glFlush(); |
12 | } |
13 |
14 |
15 | int main(int argc, char* argv[]) |
16 | { |
17 | glutCreateWindow("Simple"); |
18 | glutDisplayFunc(mydisplay); |
19 | glutMainLoop(); |
20 | return 0; |
21 | }http://alloc.tistory.com/128 |
설정
트랙백
댓글
글
openGL 설치
출처 : http://karl27.blog.me/20186952430
OpenGL 설치하기
(실행 및 개발 환경 만들기)
Open GL 은 이름 그대로 모두에게 열려 있는 라이브러리 이므로 방법만 알면 다운로드를 받아서 설치를 할 수 있습니다. 여기서는 윈도우 환경에서의 Open GL을 설치를 하도록 하겠습니다.
하지만, Open GL 을 설치하기 전에 먼저 준비가 되어야 하는 것은 VS(Visual Studio 20xx)입니다. 윈도우 운영체제 자체에도 일부 Open GL에 필요한 파일이 있기 때문입니다. Open GL 관련 교재의 경우는 필요한 파일을 목록표로 되어 있는 것도 볼 수 있는데요. 일반적인 윈도우 환경의 사용자이고, VS를 갖고 있다면, 대부분의 파일은 자동으로 설치가 되어 있기때문에 실제로 3개의 파일만 복사를 하면 됩니다.
여튼 OpenGL의 공식 사이트인 <http://www.opengl.org> 에 접속을 하면 다운 로드를 받을 수 있습니다. 물론 이 블로그에도 업로드를 해놓기는 했지만, 안정성에 의심이 되는 경우 아래와 같은 과정으로 필요한 파일을 다운로드 받을 수 있습니다.
(이 포스트에서는 해당 그림은 클릭하면 원본크기로 볼 수 있습니다.)
1. OpenGL에 접속하기(http://www.opengl.org)
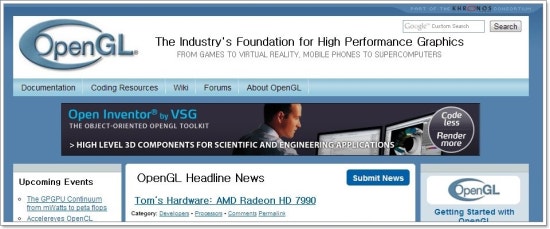
OpenGL 공식 웹페이지 모습
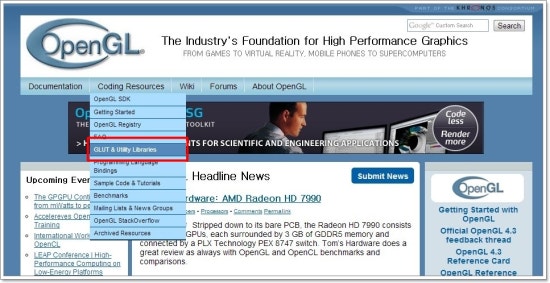
2. Coding
Resources->GLUT&Utility Libraries 을 클릭
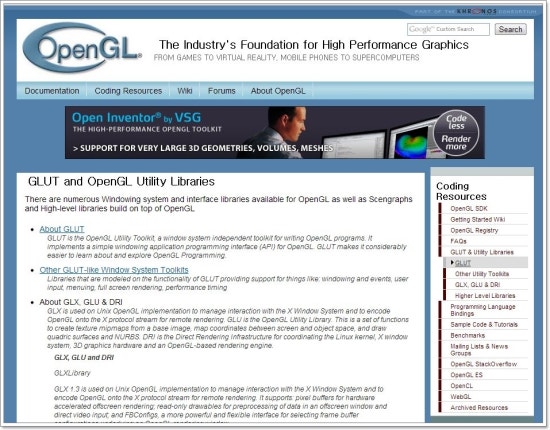
3. 오른쪽에 새로운 탭에 생긴것을
알 수 있습니다. 'GLUT'를 누르면 됩니다.
4. 아래로 내리다
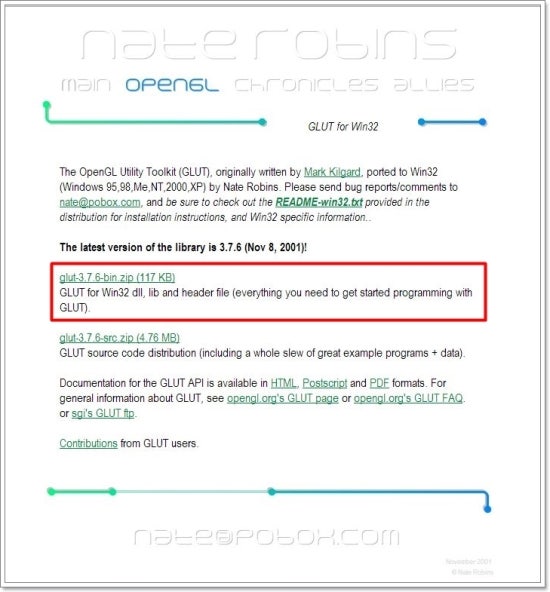
보면, 'Nate Robin's GLUT for Windows page'가 있습니다.
이 페이지에 접속을 해서 다운로드를 받으면 됩니다.
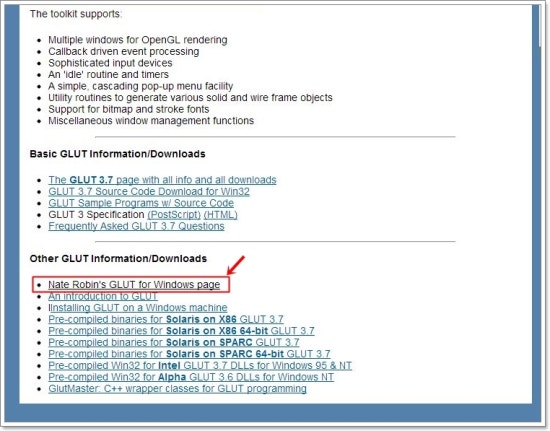
참고로 Nate Robin's GLUT for Windows page에서 다운 로드를
받을 수 있는데, 저는 정확히는 잘 모르겠지만, 한국의 포털 사이트 Nate와 좀 다른 걸로 알고 있습니다.
5. 붉은 박스에 되어
있는 'glut-3,7 6-bin.zip' 을 클릭해서 다운로드 받으면 됩니다.
이제 부터는 설치 하면 됩니다. 오픈
소스는 특정 회사에서 제공하는 소스가 아니다 보니 필요한 위치에 사용자가 직접 복사를 해주어야 합니다.
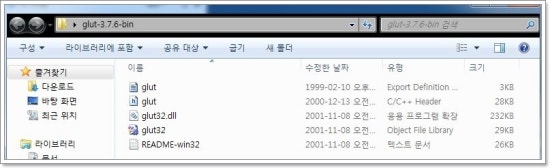
'glut-3,7 6-bin.zip'의 내용물. 여기서 필요한 파일은 3개이고 나머지는 읽어보면 된다.
VS2005 이상 버전이 설치가 되어 있다면, 위 그림과 같은 파일들을 각각 필요한 곳에 복사를 해주면 됩니다.
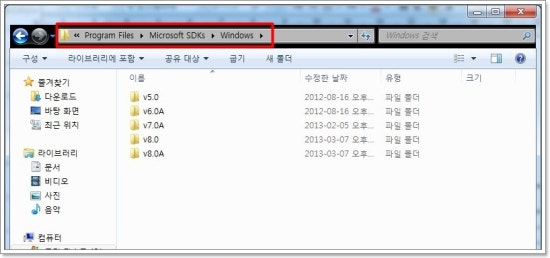
위와 같이 Visual Studio 에서 사용하는 라이브러리 폴더를 찾으면 됩니다.
일반적으로 Program Files -> Microsoft SDKs -> Windows 로 들어가면 됩니다.
이후에 보면 위의 그림과 달리 폴더가 여러 종류 있는 사람도 있고, 한 두개만 있는 사람도 있을 겁니다.
v5.0 은 VS 2005 라이브러리,
v6.0(혹은 v6.0A)는 VS2008 라이브러리,
v7.0(혹은 v7.0A)는 VS2010 라이브러리,
v8.0(혹은 v8.0A)는 VS2012 의 라이브러리 입니다.
따라서 자신이 사용할 툴 버전을 고려해서 복사를 하면됩니다.
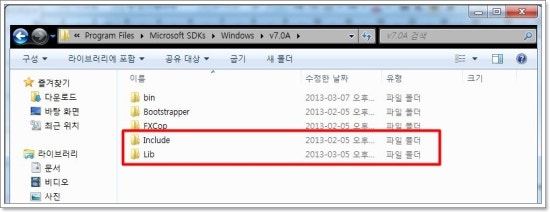
v7.0A 폴더의 모습.
저는 VS2010에서 사용하려고 v7.0A폴더에 들어간 모습입니다. 그림과 같이 Include 폴더와 Lib 폴더가 보이면 됩니다.
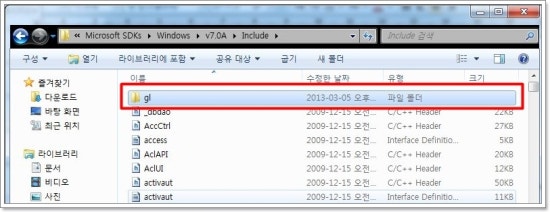
많은 헤더파일을 볼 수 있습니다 그림과 같이 gl폴더 안에 아까 다운 받은 'glut.h' 파일을 복사를 해주면 됩니다. gl 폴더에 있는 기존에 있는 헤더파일도 OpenGL에서 사용하는 파일들인데 이미 설치가 되어 있는 것 뿐입니다.
Lib 폴더에는 앞에서 다운 받은 'glut32.lib'파일을 복사해 주면 됩니다.
(간단하므로 여기서는 생략을 하도록 하겠습니다.)

실행과 관련있는 glut32.dll를 넣어야하는 곳
여기서는 윈도우 운영체제이기 때문에... 운영체제가 설치되어 있는 로컬 디스크의 windows 폴더로 이동을 합니다.
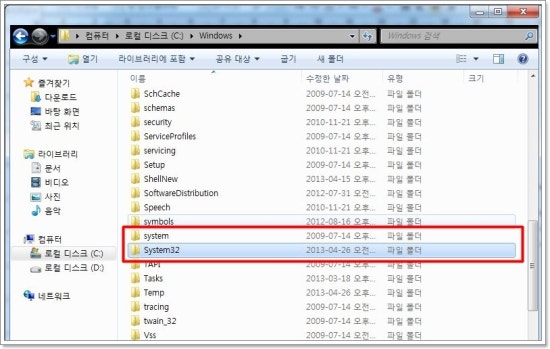
Win7 운영체제 이후에는 system 폴더에 넣어도 되고, Win7을 포함한 이전 운영체제는 system32에 'glut32.dll' 파일을 복사해서 넣어주면 됩니다.
설치에 대해서 설명한 다른 블로그들(Open GL서적도 포함)을 보면은 이후에 실행을 하기 위해서 Visual Studio 환경을 설정을 하는 것도 있는데, Visual Studio 설치가 정상적으로 되었을 경우에는 굳이 설정을 안해도 바로 사용을 할 수 있습니다.(즉, 설정을 할 필요 없음!!!)
이제 준비가 다 되었는데요. 다음에는 간단한 예제를 통해서 조금씩 OpenGL을 통한 그래픽스의 세계를 탐험해 나가도록 합시다.
[출처] [OpenGL]OpenGL 설치하기(실행 및 개발 환경 만들기)|작성자 하이벅
설정
트랙백
댓글
글
reshape.cpp
#include<GL/glut.h>
#include<stdlib.h>
void MyDisplay()
{
glClear(GL_COLOR_BUFFER_BIT);
glColor3f(0.5,0.5,0.5);
glBegin(GL_POLYGON);
glVertex3f(-0.5,-0.5,0.0);
glVertex3f(0.5,-0.5,0.0);
glVertex3f(0.5,0.5,0.0);
glVertex3f(-0.5,0.5,0.0);
glEnd();
glFlush();
}
void MyKeyboard(unsigned char key, int x, int y)
{
if(key=='Q')
{
exit(0);
}
else if(key=='q')
{
exit(0);
}
else if(key==27)
{
exit(0);
}
}
void MyReshape(int width,int height)
{
glViewport(0,0,width,height);
GLfloat widthFactor=(GLfloat)width/(GLfloat)300;
GLfloat heightFctor = (GLfloat)width/(GLfloat)300;
glMatrixMode(GL_PROJECTION);
glLoadIdentity();
glOrtho(-1.0*widthFactor,1.0*widthFactor,-1.0*heightFctor,1.0*heightFctor,-1.0,1.0);
}
int main(int argc, char **argv)
{
glutInit(&argc,argv);
glutInitDisplayMode(GLUT_RGB);
glutInitWindowSize(300,300);
glutInitWindowPosition(0,0);
glutCreateWindow("Reshape Test");
glClearColor(1.0,1.0,1.0,1.0);
glutDisplayFunc(MyDisplay);
glutReshapeFunc(MyReshape);
glutKeyboardFunc(MyKeyboard);
glutMainLoop();
}
설정
트랙백
댓글
글
mouse.cpp
#include<gl/glut.h>
GLint topLeftX, topLeftY, bottomRightX, bottomRightY;
void MyDisplay()
{
glViewport(0,0,300,300);
glClear(GL_COLOR_BUFFER_BIT);
glColor3f(0.5,0.5,0.5);
glBegin(GL_POLYGON);
glVertex3f(topLeftX/300.0,(300-topLeftY)/300.0,0.0);
glVertex3f(topLeftX/300.0,(300-bottomRightY)/300.0,0.0);
glVertex3f(bottomRightX/300.0,(300-bottomRightY)/300.0,0.0);
glVertex3f(bottomRightX/300.0,(300-topLeftY)/300.0,0.0);
glEnd();
glFlush();
}
void MyMouseClick(GLint button, GLint state, GLint x, GLint y)
{
if(button==GLUT_LEFT_BUTTON && state ==GLUT_DOWN)
{
topLeftX=x;
topLeftY=y;
}
}
void MyMouseMove(GLint x, GLint y)
{
bottomRightX=x;
bottomRightY=y;
glutPostRedisplay();
}
int main(int argc,char** argv)
{
glutInit(&argc,argv);
glutInitDisplayMode(GLUT_RGB);
glutInitWindowSize(300,300);
glutInitWindowPosition(0,0);
glutCreateWindow("Mouse Test");
glMatrixMode(GL_PROJECTION);
glLoadIdentity();
glClearColor(1.0,1.0,1.0,1.0);
glOrtho(0.0,1.0,0.0,1.0,-1.0,1.0);
glutDisplayFunc(MyDisplay);
glutMouseFunc(MyMouseClick);
glutMotionFunc(MyMouseMove);
glutMainLoop();
}
설정
트랙백
댓글
글
실습 채팅 ClientFrame
import java.net.*;
import java.io.*;
import javax.swing.*;
import java.awt.*;
import java.awt.event.*;
import java.util.*;
public class ClientFrame extends JFrame implements ActionListener{
private JTextArea display;
private JTextField inputFiled;
private JButton sendButton;
private JScrollPane topPane;
private JPanel bottomPanel;
private BufferedReader input;
private PrintWriter output;
private String name;
public ClientFrame()
{
display =new JTextArea(5,15);
display.setEditable(false); //키보드로 마음데로 입력 못함
inputFiled =new JTextField(15);
inputFiled.addActionListener(this);
sendButton=new JButton("Send");
sendButton.addActionListener(this);
topPane =new JScrollPane(display);
bottomPanel=new JPanel();
bottomPanel.setLayout(new FlowLayout());
bottomPanel.add(inputFiled);
bottomPanel.add(sendButton);
this.setLayout(new BorderLayout());
this.add(topPane,"Center");
this.add(bottomPanel,"South");
this.setSize(300,400);
this.setTitle("클라이언트");
this.setDefaultCloseOperation(JFrame.EXIT_ON_CLOSE);
this.setVisible(true);
}
public static void main(String [] ar)
{
new ClientFrame();
}
@Override
public void actionPerformed(ActionEvent e) {
// TODO Auto-generated method stub
}
}
'학교 > 엔터프라이즈' 카테고리의 다른 글
| 엔터프라이즈 실습4 (0) | 2013.03.28 |
|---|---|
| 엔터프라이즈 실습3 (0) | 2013.03.27 |
| 엔터 프라이즈 (0) | 2013.03.22 |
| 엔터프라이즈 (0) | 2013.03.06 |