검색결과 리스트
분류 전체보기에 해당되는 글 643건
- 2020.01.16 Node.js와 mongoose로 간단한 게시판 만들기 1
- 2019.10.28 Nodejs & NPM 설치
- 2019.10.15 [STS] bean graph tap 안뜰때
- 2019.10.04 js 정리
- 2019.09.19 Spring Pom.xml 에러
- 2019.08.05 Spring 초기 설정, 오류
- 2019.04.24 아톰 에디터 소스창 설정
- 2019.04.23 position 정의
- 2019.02.18 [엑셀 컨트롤 삭제] 인터넷 웹페이지 복사후 체크박스, 옵션 일괄삭제
- 2019.01.30 용어정리
글
Node.js와 mongoose로 간단한 게시판 만들기
출처 : https://supdev.tistory.com/37
* 전체 소스는 아래 github에 등록되어 있습니다.
https://github.com/Yun-hyunyoung/Nodejs-board-sample
node.js에서 mongodb로 데이터 입력 및 ejs로의 데이터 전송을 연습하기 위해
간단한 게시판 Sample을 만들어보려고 합니다.
mongodb가 설치되어 있어야 하며 기준 database의 이름은 mydb로 설정되어 있습니다.
먼저 mongoose를 설치하고 app.js에 mongodb와 연결하는 코드를 입력합니다.
npm install mongoose
app.js
... // mongodb setup var mongoose = require('mongoose'); var promise = mongoose.connect('mongodb://localhost/mydb', { useMongoClient: true }); var db = mongoose.connection; db.on('error', console.error.bind(console, 'connection error:')); db.once('open', function() { // we're connected! console.log('connected successfully'); }); ...
Board model과 Comment model을 작성합니다.
boardSchema의 comments 컬럼에는 commentSchema를 배열 형태로 넣어줍니다.
models/board.js
var mongoose = require('mongoose');
var Schema = mongoose.Schema;
var commentSchema = new Schema({
contents: String,
author: String,
comment_date: {type: Date, default: Date.now()}
});
var boardSchema = new Schema({
title: String,
contents: String,
author: String,
board_date: {type: Date, default: Date.now()},
comments: [commentSchema]
});
module.exports = mongoose.model('board', boardSchema);
models/comment.js
var mongoose = require('mongoose');
var Schema = mongoose.Schema;
var commentSchema = new Schema({
contents: String,
author: String,
comment_date: {type: Date, default: Date.now()}
});
module.exports = mongoose.model('comment', commentSchema);
라우팅 파일을 작성합니다.
기능은 5가지로 구성되어 있습니다.
1. Root 페이지로 이동 : GET : /
root 페이지로 이동하며 db에 board collections을 쿼리하여 그 데이터를 ejs로 넘겨줍니다.
2. 글쓰기 페이지로 이동 : GET : /write
글쓰기 페이지로 이동
3. 글쓰기 : POST : /board/write
form 데이터를 가져와 mongodb board collection에 입력
4. 글 찾기 : GET : /board/:id
board의 id값으로 글을 찾아 데이터를 ejs로 넘겨줍니다.
5. 댓글 입력 : POST : /comment/write
form 데이터를 가져와 mongodb board collections에 comments document로 $push 합니다.
실제 입력된 데이터
> db.boards.find().pretty(); { "_id" : ObjectId("5964c257dcc0900b20c630a1"), "author" : "길동", "contents" : "내용", "title" : "제목", "comments" : [ { "author" : "관순", "contents" : "댓글", "_id" : ObjectId("5965994d78a21010206b65ba"), "comment_date" : ISODate("2017-07-12T03:34:46.385Z") }, { "author" : "관순이", "contents" : "댓글2", "_id" : ObjectId("596599c7f9d7811200462142"), "comment_date" : ISODate("2017-07-12T03:37:28.476Z") } ], "board_date" : ISODate("2017-07-11T12:19:26.023Z"), "__v" : 0 }
router/index.js
var express = require('express'); var router = express.Router(); var Board = require('../models/board'); var Comment = require('../models/comment'); /* GET home page. */ router.get('/', function(req, res, next) { Board.find({}, function (err, board) { res.render('index', { title: 'Express', board: board }); }); }); /* Write board page */ router.get('/write', function(req, res, next) { res.render('write', { title: '글쓰기' }); }); /* board insert mongo */ router.post('/board/write', function (req, res) { var board = new Board(); board.title = req.body.title; board.contents = req.body.contents; board.author = req.body.author; board.save(function (err) { if(err){ console.log(err); res.redirect('/'); } res.redirect('/'); }); }); /* board find by id */ router.get('/board/:id', function (req, res) { Board.findOne({_id: req.params.id}, function (err, board) { res.render('board', { title: 'Board', board: board }); }) }); /* comment insert mongo*/ router.post('/comment/write', function (req, res){ var comment = new Comment(); comment.contents = req.body.contents; comment.author = req.body.author; Board.findOneAndUpdate({_id : req.body.id}, { $push: { comments : comment}}, function (err, board) { if(err){ console.log(err); res.redirect('/'); } res.redirect('/board/'+req.body.id); }); }); module.exports = router;
view/index.ejs body 태그
root 페이지로 보낸 board를 받아 제목을 뿌려줍니다.
제목의 href로 board의 _id값을 붙여 id로 board를 find할 수 있도록 합니다.
<%= title %>
Welcome to <%= title %>
글쓰기
<% if (board !== null){ for(var i = 0; i < board.length; i++) { %>
<%= i+1 %> - <%=board[i].title%>
<% }} %>
view/write.ejs body 태그
<%= title %>
Welcome to <%= title %>
제목 :
내용 :
글쓴이 :
view/board.ejs body 태그
board의 id로 찾아온 board 객체를 뿌려줍니다.
board 안에 comment 데이터가 존재할 경우 같이 뿌려줄 수 있도록 구현햇습니다.
<%= title %>
Welcome to <%= title %>
제목 : <%=board.title%>
작성자 : <%=board.author%>
내용 : <%=board.contents%>
<% if (board.comments !== null) { var comment = board.comments; for(var i = 0; i < board.comments.length; i++) {%> 작성자 : <%=comment[i].author%> 내용 : <%=comment[i].contents%>
<%}}%> 댓글 :
글쓴이 :
결과

< 메인화면 >

< 글쓰기 화면 >

< 글 상세보기 화면 >
'회사' 카테고리의 다른 글
| Nodejs & NPM 설치 (0) | 2019.10.28 |
|---|---|
| js 정리 (0) | 2019.10.04 |
| Spring 초기 설정, 오류 (0) | 2019.08.05 |
설정
트랙백
댓글
글
Nodejs & NPM 설치
출처 : https://gocoder.tistory.com/1032
Nodejs + express를 설치하고 서버를 구동시켜보려고 합니다.
먼저 AWS EC2 ubuntu 16.04 인스턴스를 생성해 주었고 그곳에 설치를 진행하였습니다.
1. Nodejs & NPM 설치
curl -sL https://deb.nodesource.com/setup_10.x | sudo -E bash -Node.js를 버전별로 설치 할 수 있습니다.
저는 LTS버전인 10.16.3을 설치하기 위해 10.x를 입력하고 설치를 진행하였습니다.
sudo apt-get install -y nodejsnode.js를 설치하는 명령어입니다. 설치되면 npm도 같이 설치되는 걸 확인할 수 있습니다.
2. Express framework 설치
sudo npm install -g expressexpress를 설치하는 명령어입니다.
-g는 글로벌 모듈로 현재 경로가 아닌 /usr/lib/node_modules에 모듈을 설치합니다.
sudo npm install -g express-generatorexpress-generator를 설치해줍니다.
node.js + Express 서버 구조의 뼈대를 만들어주는 도구입니다.
3. 프로젝트 생성 및 구동
sudo express test-nodejs프로젝트 자동으로 생성해줍니다.
cd test-nodejs프로젝트 안으로 이동
npm install
npm start
npm 모듈을 설치하고 앱을 실행합니다.
서버에 접속하기 전 AWS 인스턴스 인바운드 규칙에 포트 3000번을 열어줍니다.
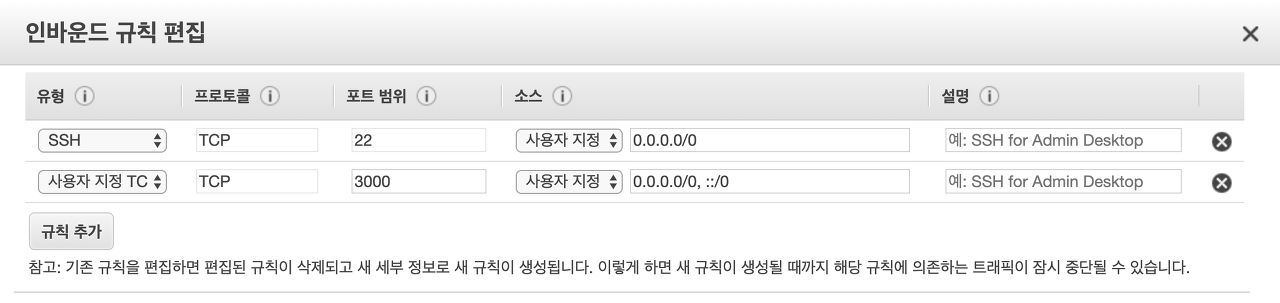
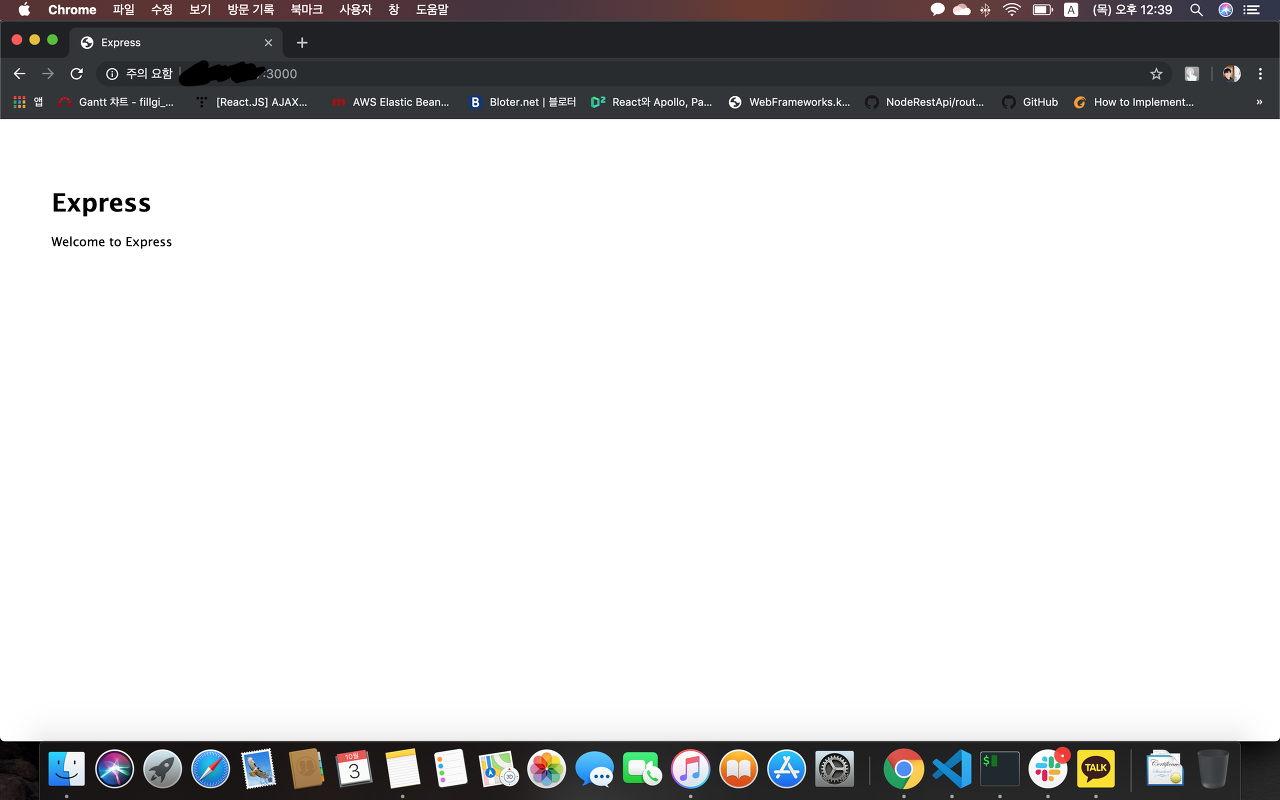
그러고 나서 http://ip주소:3000를 입력하면 정상적으로 웹서버가 구동되고 있음을 확인할 수 있습니다.
'회사' 카테고리의 다른 글
| Node.js와 mongoose로 간단한 게시판 만들기 (1) | 2020.01.16 |
|---|---|
| js 정리 (0) | 2019.10.04 |
| Spring 초기 설정, 오류 (0) | 2019.08.05 |
설정
트랙백
댓글
글
[STS] bean graph tap 안뜰때
xml 파일 우클릭 spring ->configuration 클릭
'회사 > Spring' 카테고리의 다른 글
| Spring Pom.xml 에러 (0) | 2019.09.19 |
|---|
설정
트랙백
댓글
글
js 정리
스코프
var은 함수 스코프에서 유효합니다.
let, const는 블록 스코프에서 유효합니다.
const는 선언과 동시에 할당이 일어나야하고, 재할당이 불가합니다.
호이스팅
호이스팅은 var을 통해 정의된 변수의 선언문을 유효 범위의 최상단으로 끌어올리는 행위를 말합니다.
변수 '할당'이 함수 선언보다 우선 순위이고, 함수 선언이 변수 선언보다 우선 순위입니다.
함수 선언문과 변수 할당문이 존재할경우, 변수 a선언 -> 함수 a선언 -> a에 값할당 순으로 실행되겠습니다.
클로져
함수 밖에서 선언된 변수를 함수 내부에서 사용할 때 클로저가 생성된다는 것만 기억하세요.
'회사' 카테고리의 다른 글
| Node.js와 mongoose로 간단한 게시판 만들기 (1) | 2020.01.16 |
|---|---|
| Nodejs & NPM 설치 (0) | 2019.10.28 |
| Spring 초기 설정, 오류 (0) | 2019.08.05 |
설정
트랙백
댓글
글
Spring Pom.xml 에러
프로젝트 오른쪽누르고 인폴트 -> 마빈->인스톨 or 디폴로이 아티팩트 마빈 레파지토리 클릭
파일 올리고 그룹,아티팩트 아이디 입력 버전 입력 후 피니쉬
에러나는거 전부 이렇게 넣어주고
프로젝트 다시 오른쪽 누르고 마빈 들어가서 프로젝트 업데이트
끝
'회사 > Spring' 카테고리의 다른 글
| [STS] bean graph tap 안뜰때 (0) | 2019.10.15 |
|---|
설정
트랙백
댓글
글
Spring 초기 설정, 오류
Spring Tool Suite 설치,maven설정
https://devjjo.tistory.com/20
spring 프로젝트생성 톰켓 연결
https://huskdoll.tistory.com/184
톰켓 설치 port 8085
https://jun7222.tistory.com/34
myabtis 연동
https://huskdoll.tistory.com/192
web page
oracle11g
https://offbyone.tistory.com/13
오류
https://hunit.tistory.com/211
http://skillsocius.com/220795637365
http://myblog.opendocs.co.kr/archives/1702
https://acua.tistory.com/entry/import-javaxservlet-cannot-be-resolved
https://kkiuk.tistory.com/56
락해제
https://2ssoosike.tistory.com/102
sts 스프링플레임워크 툴
maven
자바 프로젝트의 빌드(build)를 자동화 해주는 빌드 툴
mybatis 디비랑 스프링이 연동
comic.naver.com
https://sehwan93.github.io/Spring+Oracle+Mybatis-%EC%84%A4%EC%A0%95/
스프링 web.xml 설명
https://mkil.tistory.com/286
'회사' 카테고리의 다른 글
| Node.js와 mongoose로 간단한 게시판 만들기 (1) | 2020.01.16 |
|---|---|
| Nodejs & NPM 설치 (0) | 2019.10.28 |
| js 정리 (0) | 2019.10.04 |
설정
트랙백
댓글
글
아톰 에디터 소스창 설정
Snippet 만들다가 자동 줄바꿈이 안되서 아쉬웠습니다.
이 부분에 대해 설정을 만져보려 합니다.
따로 패키지 설치는 안하셔도 됩니다.
윈도우의 경우 : File -> Settings 를 눌러줍니다.

맥의 경우 : Atom -> Preferences... 을 눌러줍니다.
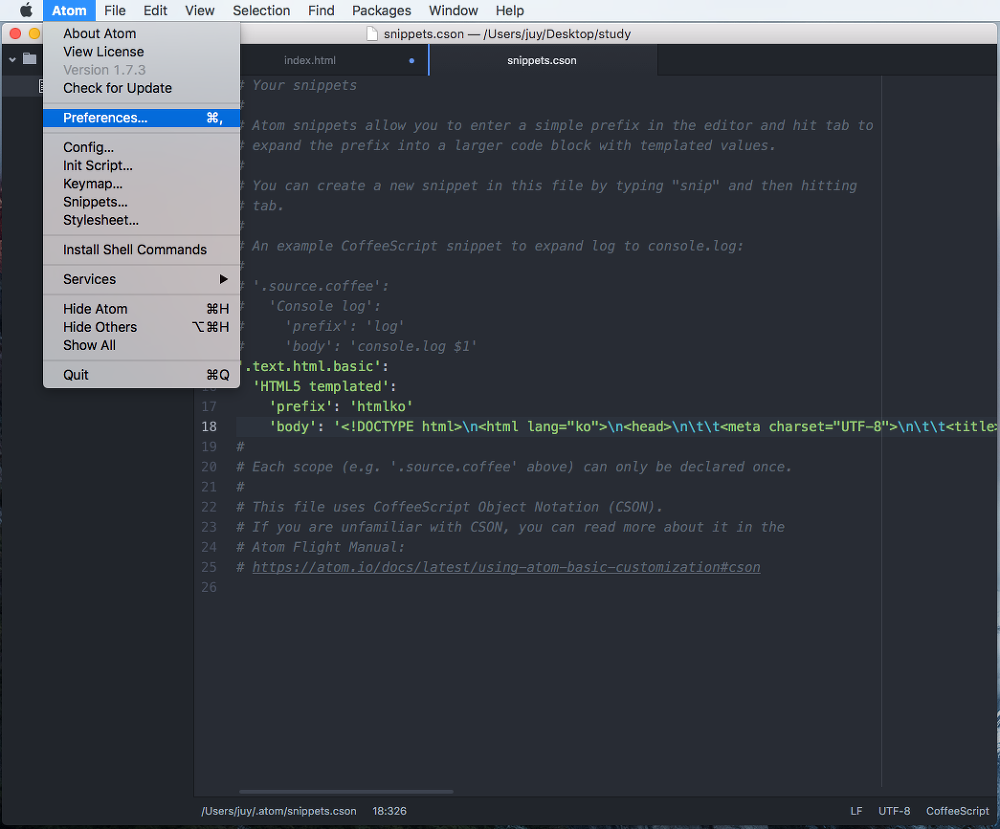
스크롤을 살짝 내리면 Soft Wrap 라는게 보입니다. 여기에 체크해 주시면 자동 줄바꿈이 설정됩니다.
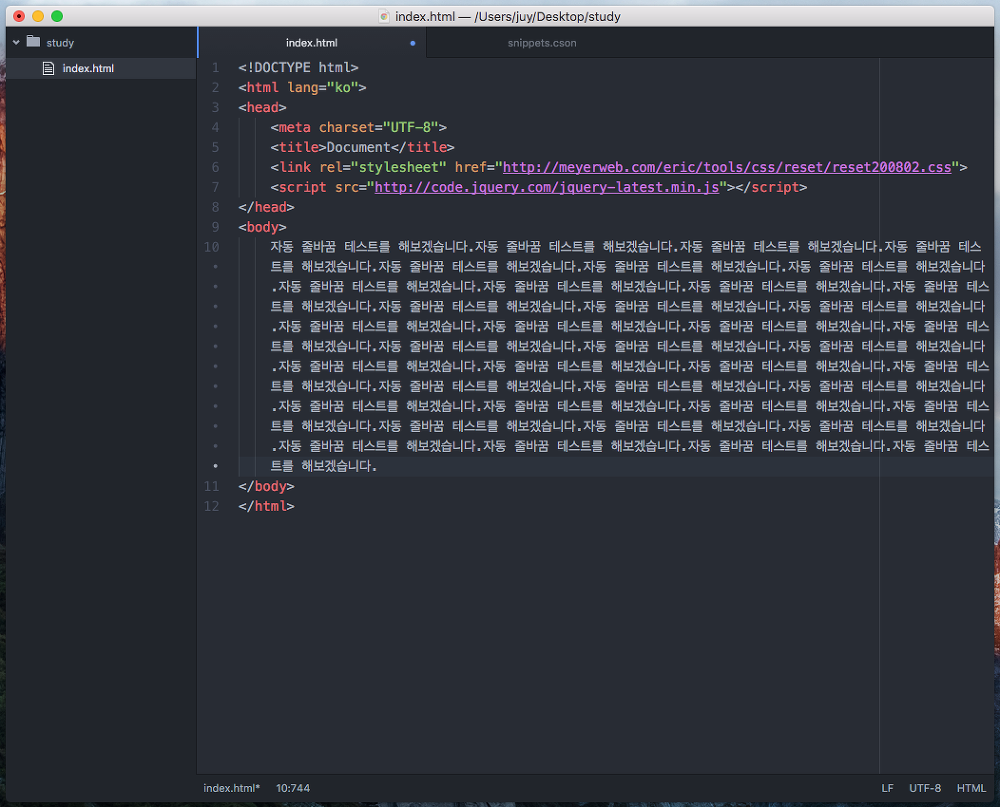
또 Show Indent Guide를 체크하게 되면 태그 사이에 가는 실선이 생깁니다.

결과는 자동 줄바꿈이 설정 되었고, 눈치채셨는지 모르겠지만 좌측에 가는 실선이 생긴게 보입니다.
출처: https://recoveryman.tistory.com/238 [회복맨 블로그]
'JavaScript' 카테고리의 다른 글
| position 정의 (0) | 2019.04.23 |
|---|---|
| HTTP Status 404 (0) | 2014.01.26 |
| jsp, html 한글 적용 (0) | 2014.01.12 |
설정
트랙백
댓글
글
position 정의
position 속성
엘리먼트의 위치를 지정하는 방법 (static, relative, absolute, fixed)
position속성 미지정시 기본값은 static
static - 원래 있어야 되는 위치에 정적으로 위치함(offset 무시)
위치 설정이 되지 않은 상태
top, bottom, left, right(offset)을 적용하고 싶을 경우
position의 값을 static외의 값으로 지정해야 한다.
(bottom, right < top, left 적용)
*position을 지정해도 offset값을 지정하지 않을경우
static처럼 원래 있어야 할 위치에 있게된다
relative - 원래의 위치에서 상대적으로 위치를 변경
absolute - html element를 기준으로 절대적인 위치로 변경
**부모-자식 관계에 놓인 태그의 경우
1) 자식태그가 absolute인 경우 부모태그는 자신의 크기만 가진다.
이 때 자식태그는 block태그여도 inline태그처럼 컨텐츠만한 크기로 변한다.
width와 height 값을 지정하면 크기 변경이 가능하다.
(★fixed도 같은 효과)
2) 여러 부모태그 중 absolute인 자식태그는
position이 relative인 부모태그안에서 절대적으로 위치를 변경한다.
fixed - 화면의 위치에 고정시켜 스크롤으로부터 독립되게 한다.
'JavaScript' 카테고리의 다른 글
| 아톰 에디터 소스창 설정 (0) | 2019.04.24 |
|---|---|
| HTTP Status 404 (0) | 2014.01.26 |
| jsp, html 한글 적용 (0) | 2014.01.12 |
설정
트랙백
댓글
글
[엑셀 컨트롤 삭제] 인터넷 웹페이지 복사후 체크박스, 옵션 일괄삭제
https://yhlover.tistory.com/295
설정
트랙백
댓글
글
용어정리
SLA : Service Level Agreement의 뜻으로 서비스 수준 협의서라고 부른다.
ISV : ISV는 하나 이상의 컴퓨터 하드웨어나 운영체계 플랫폼에서 실행되는 소프트웨어 제품을 만들고 판매하는 회사를 말한다.
SaaS, PaaS, laas : https://m.blog.naver.com/quart21c/173614581
전사적 자원 관리(ERP), 고객 관계 관리(CRM)
'교육' 카테고리의 다른 글
| 빅데이터 분석 및 분산 처리를 위한 하둡 2일차 오전 (0) | 2015.11.12 |
|---|---|
| 빅데이터 분석 및 분산 처리를 위한 하둡 1일차 오후 (0) | 2015.11.11 |
| 빅데이터 분석 및 분산 처리를 위한 하둡 1일차 오전 (0) | 2015.11.11 |